Kids – Learn how to make a cloud in your own kitchen! (With the help of a grown up + VIDEO)
14/04/2016 10:31pm

> From the WeatherWatch archives
Have you ever imagined what it might be like inside of a cloud?
Did you know that if you were in one, you would get soaking wet?
There are many different types of clouds, but one thing they have in common is that they’re all made of water (or ice). But how do clouds form, and how is it possible that water can float above us in the air?
In this activity you’ll make your own cloud in a jar and get to test the conditions that are required to make a cloud form!
Background
In order to understand cloud formation, we need to understand the processes of vaporization (water going from a liquid to a gas) and condensation (water going from a gas to a liquid).
If you’ve ever boiled a pot of water or watched one boil, you’ve seen water change from a liquid to a gas.
In liquid form, water molecules are packed very close together.
This proximity allows the formation of hydrogen bonds between individual water molecules, so that each water molecule is connected to the water molecules surrounding it.
You can observe this by looking at a droplet of water on a flat surface. Instead of spreading out flat, the water droplet holds a rounded shape.
The droplet can hold this shape due to the strength of hydrogen bonds between the individual water molecules that form the droplet.
As you heat a pot of water, you add energy to the individual water molecules.
When enough energy is added, the water molecules are able to break the bonds between them and escape as a gas into the air.
As these individual water molecules break away from the surface of the boiling water and rise above the pot, they lose energy (in the form of heat).
As a result, these cooler water molecules condense into tiny water droplets, which we see as steam.
Cloud formation follows these same basic principles.
As warm air rises (carrying moisture in the form of water vapor), it expands and cools.
When this happens, the water vapor condenses into its liquid form.
This condensation is the same type that you’ll find on your grass or car window on a spring morning.
In a cloud, the water droplets attach to tiny dust particles floating in the air. Billions of these wet dust particles create a cloud!
In this activity you will simulate cloud formation by rapidly changing the temperature of the water in the jar.
You will try different variables to determine what the important factors are in cloud formation—and how different conditions determine whether or not clouds form in the atmosphere.

Materials
- Flat workstation that can get wet (from any water spills)
- Glass jar with tight-sealing lid (such as a mason jar or clean pickle jar)
- Half a cup of very hot water (handled with caution and an adult’s help)
- Half a cup of very cold water
- Aerosol spray can (Use something clear, for example hair spray.)
- Bowl of ice cubes
- Permanent marker or piece of tape
- Piece of black construction paper to help you visualize the cloud (optional)
- Food coloring to make your cloud stand out more (optional)
Preparation
- Pour half a cup of water into the jar and use a marker or piece of tape to mark the water level on your jar. Empty the jar.
- If you choose to use black construction paper, set it up against a wall or propped against a book near where you will be conducting your activity. This paper will serve as a backdrop—but you can’t pick up the jar once you put the hot water in, so the paper should be right next to your workstation.
- Remove the lids from the jar and the aerosol spray so that they’re ready to use.
- If you choose to use food coloring to dye the water, drop a few drops into both the hot and cold water before starting
- Gather all materials and arrange them in easy reach of your workstation. This activity requires you to work quickly, so prepare by having everything ready to go before starting.
- With the help of an adult, heat the water to boiling
Procedure
- Have an adult carefully pour the boiling water into the jar.
Notice whether the water level reaches the mark you made on the jar.
If it doesn’t, pay attention to exactly where the water level is right when you pour the water into the jar.
What do you notice about the water? Can you see steam rising?
- Quickly spray a few full sprays from the aerosol can into the jar, then have an adult seal the jar with the lid. (Use caution to avoid the very hot steam from the jar.)
What happens when the spray enters the jar? Do you notice anything changing?
- Place the ice cubes on top of the jar lid.
Take a few minutes to observe what is happening inside the jar.
What do you notice? What is different about the jar after you sealed the water and spray inside?
Before opening the lid, check whether the water level has changed since you first poured the water into the jar.
Has the water level changed? What might cause a change in the water level inside the jar?
- Slowly and carefully loosen then lift the lid from the jar.
Observe the open jar. What do you notice about its contents? What is happening inside? Is anything leaving the jar? What is it?
- Carefully (avoiding a splash) drop a few ice cubes into the jar.
Observe the jar for a few more minutes. Did the ice cubes change what was happening inside? If so, what changed?
Carefully pour out the water and rinse the jar.
Repeat the activity with the cold water using following the steps below.
- Carefully pour the cold water into the jar. Notice whether the water level reaches the mark you made on it.
If it doesn’t, pay attention to exactly where the water level is right when you pour the water into the jar.
What do you notice about the water? Can you see steam rising? Why don’t you see steam rising with cold water?
- Quickly aim a few full sprays from the aerosol can into the jar, then seal the jar with the lid.
What happens when the spray enters the jar? Do you notice anything changing?
- Place the ice cubes on top of the jar lid.
Take a few minutes to observe what is happening inside the jar. What do you notice? What is different about the jar after you sealed the water and spray inside?
What is different about this experiment, compared with when you tried it with hot water?
Before opening the lid, notice whether the water level has changed since you first poured the cold water into the jar. Has the water level changed? What might cause a change in the water level inside the jar?
Slowly and carefully loosen then lift the lid from the jar.
Observe the open jar. What do you notice about its contents? What is happening inside? Is anything leaving it? Why or why not?
Observations and Results
When you performed this activity with the hot water, did you observe a cloud forming?
This is what is expected.
When you repeated the activity with cold water, did you observe cloud formation?
You shouldn’t have seen a cloud when you used cold water, because you need heat to generate enough water evaporation to form a visible cloud.
In this activity you simulated cloud formation by rapidly changing the temperature of the water in the jar.
When you poured the hot water into the jar, the hot water produced water vapor; as this water vapor rose to the top, it was cooled by the ice cubes resting on the lid.
As a result, the water vapor quickly condensed into tiny water droplets at the top of the jar.
To simulate the dust particles that cause clouds in the atmosphere, we used an aerosol spray.
The tiny particles released by the spray provided a surface to collect water condensation.
When you took the lid off the jar with the hot water, you may have noticed that your cloud remained fairly intact.
Tendrils of it may have started drifting away, as the warm air in the jar began to escape into the room.
When you dropped an ice cube into the hot water, however, you may have observed that your cloud started disappearing more quickly.
This is because the hot water quickly cooled, so it was no longer releasing water vapor. Therefore, there was no vapor to condense and form a cloud.
– For more awesome science experiments, check out Science Buddies at Scientific American, here!
– Scientific American
Latest Video
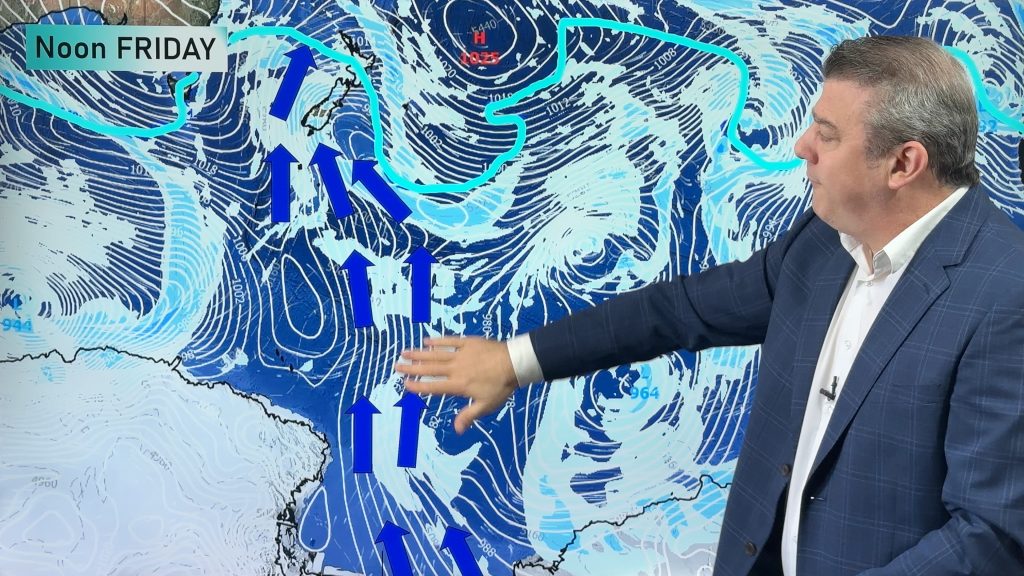
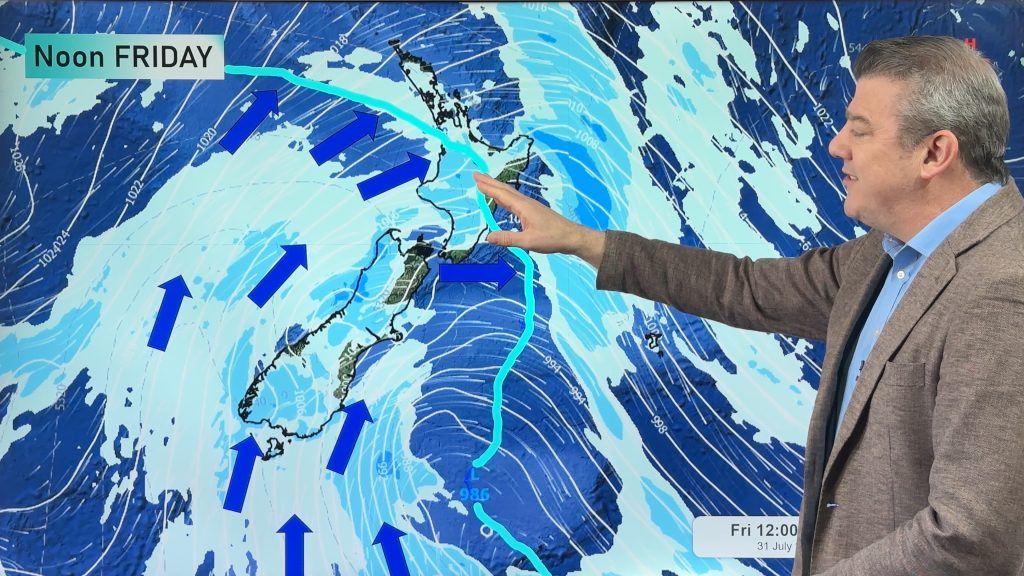
Antarctic southerly for parts of NZ Fri & Sat
For the first time this year a southerly from off Antarctica is heading towards the South Island, followed by more…
Related Articles
Antarctic southerly for parts of NZ Fri & Sat
For the first time this year a southerly from off Antarctica is heading towards the South Island, followed by more…
Snow, rain showers & cold polar southerlies set to return
Friday will be a wintry day across NZ as the next cold front arrives, bringing snow to lower levels of…

Frosts, late week rain & another cold weekend coming
High pressure will cross NZ over the next few days meaning more cold nights/mornings with frosts, but a nor’wester will…